Showing posts with label recipe review. Show all posts

Wednesday, June 13, 2012

Recipe Review: Homemade Chick-fil-A Nuggets

A few weeks ago I tried out a new recipe in honor of our upcoming move down South: homemade Chick-fil-A nuggets. I've seen this recipe from Iowa Girl Eats floating around for awhile now, and finally decided to try this recipe out.
I hate when all of the food on my plate is the same color. Does this bother anyone else, or am I just weird?
I've got to say, I was a little worried about this recipe at first. I've never fried anything before, so I was concerned I'd either burn my arm off or burn the nuggets. Turns out, that part of the process was really simple, so I had nothing to worry about. 

Also a concern? Part of the marinade (and apparently the secret behind the taste) is pickle juice. Huh? Sounds a little weird, and now we have an uneaten jar of pickles in our fridge since we had to purchase them just to use the juice in this recipe. Luckily, the final product didn't taste pickle-y at all.
The verdict: I honestly couldn't tell you when the last time I ate at Chick-fil-A was, so I have no idea if these taste like the real deal. But they were pretty dang tasty. I would recommend not using whole wheat flour, though, since the coating was a little more gritty than we would have preferred. But that's what I get for not following the recipe exactly.

Overall, this recipe was simple to follow, quick to prepare and pretty tasty! Now I'll have to order some real Chick-fil-A nuggets when we get to Florida to get a better comparison.

Monday, April 30, 2012

Recipe Review: Oatmeal Bars & Chicken Chili

I've recently tried some new recipes that I think are worth sharing. I found both recipes via Pinterest, of course. Enjoy!

Peanut Butter Banana Oatmeal Bars
from Gingerbread Bagels
I actually tried this recipe twice: first subbing applesauce for the bananas, then with bananas. I didn't use eggs either time since we don't have any on hand, and got sort of mixed results. The applesauce version came out fine in my opinion, probably because the applesauce kept the bars moist. The banana version was a little crumbly, though, and definitely needed the eggs to hold everything together. They still tasted fine, though. The first time I tried this recipe I actually at the whole pan myself in two days, so I guess you could say they're tasty. I highly recommend eating these bars warm.
Also, as an FYI, these bars are sort of cake-y as opposed to being more chewy or solid like a granola bar. So don't expect a homemade Kashi bar or something out of this recipe. And definitely don't skip the eggs in the banana version.

Grade: B 
While tasty, these bars could use a bit more flavor - maybe from some chocolate chips or pumpkin pie spice. If I make these again, I'm going to stick to the applesauce version for sure.

Slow Cooker Chicken Chili
from Skinny Taste

[check out Skinny Taste for pictures, because this recipe is anything but photogenic]

This recipe was so, so good. Drew and I have made chicken chili in the past using Ina Garten's recipe, but we agree that this recipe from Skinny Taste tasted more like chili and less like a vegetable soup with chicken. Plus this recipe was significantly less time-consuming.

Since this is a slow cooker recipe, the hands-on time was only about 10 minutes. I think the hardest part of this recipe was chopping up the onion. This recipe was delicious, incredibly filling (fiber!) and so easy. It makes a ton, so be prepared to eat this for a week or make this for guests.

Grade: A
Next time we're going to double the chili powder for more kick.

Have you tried any recipes lately that are worth sharing? Let me know! Or, find out what other recipes I've been pinning for your own inspiration.

Tuesday, March 13, 2012

Recipe Review: Broccoli-Cheese Soup

A couple weeks ago I made a batch of broccoli-cheese soup, using a recipe from The Pioneer Woman.

Drew and I have been craving broccoli-cheese soup for a while now, so I searched the internet for simple, delicious-looking recipes. I should have known the Pioneer Woman would deliver.

The recipe was super easy to follow and didn't take too long either. I followed her recipe exactly, except I used skim milk in place of whole, frozen broccoli instead of fresh and omitted the nutmeg (can you believe our giant spice rack we got as a wedding gift doesn't have nutmeg in it?).

The steps were pretty simple: chop up an onion, throw it in a pot with a bunch of dairy, add broccoli, simmer, add cheese and eat.
Three cups of cheese is... a lot of cheese.
Somewhere in between "add broccoli" and "eat" things got a little crazy. I don't know if it was the extra water from the skim milk and frozen broccoli, high heat or something else entirely, but the whole mixture just sort of separated. It was not attractive.

Not only that, but we just weren't getting the cheesy taste we wanted. I originally added three cups of cheese according to my measuring cup, but the soup just tasted like cream of broccoli so we doubled the amount of cheese.
According to a handy measurement converter magnet we have, the double amount of cheese was only two cups in ounces. So either we added twice as much cheese as the recipe called for, or not quite enough. Either way, the soup still wasn't as cheesy as we hoped it would be. Does anyone know if you're supposed to measure cheese in ounces or not? Why such a weird discrepancy in amounts?

After all that, we spooned the soup into our blender in batches to chop everything up a bit and try to remedy our separation problem. No such luck on binding things together better, but at least it looked a little nicer (although not nice enough for me to take a picture - I was pretty over this recipe at that point).

The verdict: While the soup still tasted fine (but not great), it looked absolutely disgusting even after blending. I wish I would've read the comments beforehand to see that many people experienced what I did: separated milk and not enough cheesy taste. Unfortunately this recipe is not a keeper for us.

I'll be honest, we're probably not going to eat all of this stuff (we have a bunch of it in our freezer right now). I'm not exactly sure what went wrong with the recipe, since plenty of other commenters said the soup came out perfectly for them. Maybe subbing skim milk for whole made that much of a difference? I don't know. Oh, well. I guess we're just going to have to go with store-bought the next time we want broccoli-cheese soup.

Has anyone else tried any new recipes lately? I need some ideas!

Sunday, November 27, 2011

Recipe Review: Soft Pretzels

A few weeks ago I made soft pretzels at home using a recipe from Budget Bytes. The pretzels were surprisingly easy to make and turned out really well. In fact, I made another batch this weekend, and we're already down to the last couple pretzels. 

I had never made pretzels before, and honestly thought it was going to be much tougher than it actually was. Especially since I went the route of Budget Bytes and used frozen bread dough instead of making my own. I highly recommend this recipe for it's ease and, come on, who doesn't love eating soft pretzels?

Budget Bytes lays out the recipe really well, both in writing and with pictures, so click on the link above for more detailed instructions.

Soft Pretzels
Step 1: Allow frozen dough to thaw, then cut into eight equal pieces.
Step 2: Stretch each dough piece into a long strand. The dough will not cooperate with you at first, but it'll come around eventually and stretch out for you.
Step 3: Twist each strand into a pretzel shape. Feel silly for having to consult a picture of a pretzel to make shape and wonder how those people at Auntie Anne's twist their dough so quickly.
Step 4: Let the pretzels rise for about 30 minutes.
Step 5: Boil each pretzel in a baking soda solution for one minute. This is how they get their pretzel-y taste. Who knew?! This is definitely not a step to skip, unless you just want pretzel-shaped bread rather than pretzel-flavored bread.
Step 6: Bake the pretzels and end up with a tasty, tasty result. You should also probably let the pretzels cool on a rack for awhile before you start eating them.
Step 7: Eat a pretzel. Then have another because they're so delicious.

Honestly, the hardest part of this recipe was probably stretching out the dough because that stuff likes to retract. Other than that, this recipe was one of the easiest I've ever made. Maybe sometime I'll try this with homemade dough, but the frozen dough works just fine and is much quicker.

I love baking, and I'm so glad this is a quick and simple recipe for a delicious snack. I'll need to dig up something a little more challenging for my next recipe review, though, I think. Stay tuned!

Anyone try any good recipes lately? Please share!

Wednesday, November 2, 2011

Recipe Review: S'mores Cookies

Over the weekend Drew and I made some delicious s'mores cookies using this recipe from Baked Perfection.

I love baking, but haven't made anything in so long because:
1. Living by myself = no one to share my baked goods with
2. I don't have much free time to spend baking

Luckily, though, I now have an excellent roommate/husband to share baked goods with AND I didn't have to work over the weekend, which meant plenty of free time for baking on Friday.

The only change we made to Baked Perfection's recipe was to cut out the chocolate chips and use crushed Hershey bars in their place. Otherwise, we followed the recipe pretty much exactly.

Step 1: Crush graham crackers for dough. Discover partway through crushing that the back of an ice cream scoop works better than your fist.

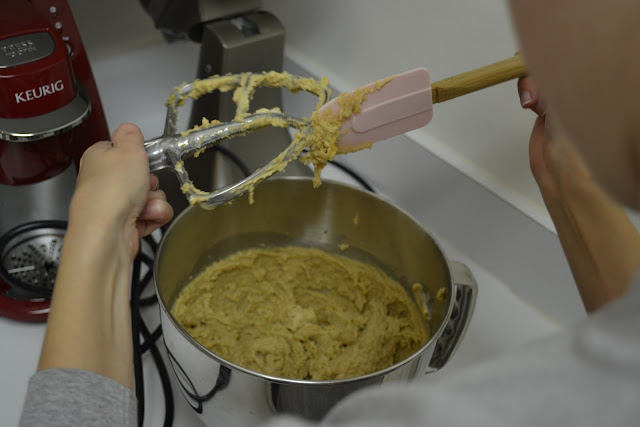
Step 2: Put graham cracker crumbs in mixer along with other baking necessities like eggs, sugar, butter, flour and other stuff.

Step 3: Mix everything together using the awesome mixer you got as a wedding gift.

Step 4: Make sure you clean all of the cookie dough off of the mixer thingy (technical term).

Step 5: Put dough balls onto cookie sheet.

Step 6: Watch cookies bake in the oven and get really excited to eat them. Also eat extra batter from bowl and neglect to share pictures of how much dough you actually ate.

 Step 7: Take cookies out of the oven and realize dough balls were not spaced out enough. Ignore the fact that your cookies will be hexagonal.

Step 8: Transfer cookies to cooling rack. Break some cookies in process, and decide those should be eaten immediately, since you obviously didn't eat enough dough earlier.

These cookies were so easy to make. I think the hardest part was getting the marshmallows in place, since that step involves removing the cookie sheets mid-baking to apply a few mini-marshmallows to each cookie. It was like a race against time.

The cookies came out much flatter than we expected (obviously), but have a nice chewy texture and really do taste like s'mores! Plus they are delicious.

The recipe says it makes about 4 dozen cookies, which is about on target with what we got (the above picture is only about half of our batch). Somehow we ended up with enough cookies to eat a few each day and give some away to Drew's parents and still have some sitting around this morning.

My review of Baked Perfection's S'mores Cookie Recipe: 4/5 spatulas (or something else baking-related)

Now everyone go make a batch of s'mores cookies and share some with me. We're running low on our supply!

Have you found any good cookie recipes lately? Please share!